Author Archives: mattsanf
SketchUp “SHIFT” Key Lock Movement
When moving an object in SketchUp using the MOVE tool, hold down the SHIFT key after selecting the object and moving it slightly in the direction that you want to move the object. This “locks” the objects movement into only moving along the axis lines, and not in “free space.” Very useful.
First SketchUp tip: left-to-right vs right-to-left SELECT window
I learned from Bob Lang’s DVD that if you use the SELECT tool by dragging a selection window from left to right across parts of your drawing, the program will only select the parts of the drawing that are contained within the window that you are dragging. If you use the SELECT tool from right to left, the tool will AUTOMATICALLY select all of the parts and faces of the object even if you only enclose part of it in your window.
On complex drawings, I have found this to be very useful. It helps you to select an entire object without accidentally overlapping and selecting its surrounding and interconnecting objects. Cool.
This is the kind of SketchUp technique that I think I would never discover from trying to learn the program entirely on my own. Trainings aids, DVDs and books are required to fully unlock the capabilities of the program.
Learning Google SketchUp for Woodworking
I had tried to learn to use Google SketchUp before to aid in design of woodworking projects.\
The program, on its face, is very easy to learn to use and really cool (and free). Unfortunately, in my prior attempts to use it for “real” I have always been stopped by small details that I just could not get to work the way that I wanted, and I always reverted to pencil and paper. The program is far more powerful than it looks, and there are a myriad of tiny details and tricks that are hidden from the user. This hidden power makes the program LOOK much simpler to use than it really is. To do SketchUp right, it takes some practice. But it’s worth it.
This year, prior to going to WIA last month, I became determined to learn SketchUp and fight may way through my hangups. After all, I deal with technology all day and I ought to be able to learn to design using this program.
I’m happy to report, that after taking Bob Lang’s SketchUp seminar at WIA, and then practicing at home using Bob’s SketchUp DVDs, I’m now successfully using SketchUp to design furniture. I love the program. It is very useful.
For those of you wanting to learn to use SketchUp for furniture making, I highly recommend buying Bob Lang’s two DVDs. Bob makes clear the small “details” that turned SketchUp from frustrating to highly useful. Bob generated many “ah-ha” moments that solved my prior problems. Additionally, I bought the book Google SketchUp: The Missing Manual by Chris Grover. Between Bob’s DVDs and the Grover book, I have been making rapid progress at learning SketchUp at last.
I will post the small SketchUp tips that have made a difference for me as I come across them.
First tip, you need to learn to use the keyboard shortcuts. I did not do this until now. I am not sure that you can use SketchUp effectively without the keyboard shortcuts, particularly for the camera and view tools.
Woodworking in America 2010 in Cincinnati, Ohio
I spent the end of last week at the 2010 Woodworking in America conference in Cincinnati, Ohio. This was my second WIA show (I attend the first one in Berea, KY two years ago).
It was a fantastic conference, once again. It has grown a lot since the first conference two years ago, but I miss the smaller size, frankly. The new bigger conference has more vendors, etc, which is nice, but it has lost some of the intimacy that the first conference offered. Other than that, it was once again a great time.
Some highlights from this year included John Sindelar’s mobile Sindelar Tool Museum. To quote Popular Woodworking Magazine “This is one of the most jaw-dropping, drool-inducing tool collections you’ll ever see”. It was…
This “mobile museum” is apparently only a tiny part of John’s full collection. Amazing.
The classes at the show were excellent also. I will blog more about them later.
Emperor Aquatics UV Lights for Ponds
Just a quick post about the use of UV lights for algae control for pond keepers.
I installed UV sterilization lights into my pond’s Savio skimmer filter box earlier this summer to try to control fine floating algae in the pond without resorting to chemicals. This is the kind of algae that causes pond water to become cloudy or milky and have a greenish cast.
I am VERY pleased with the results. Installed two Emperor Aquatics UV sterilization light units into the filter as a retro-fit, and within three days the water was crystal clear and has stayed crystal clear ever since. Amazing. The water almost has a “polished” cast to it that is hard to describe. I can easily see to the full depth of my pond now, even at its deepest point.
Click here for a full description of how this works from Emperor’s website.
They aren’t cheap, but these things really work without chemicals. In fact, they worked so well and my water became so clear that the “string algae” that grows up from the bottom of the pond in long, attached strings has actually gotten worse….so, one problem solved and a new one is created. It was worth it though. I am currently experimenting with barley grass as a string algae control solution. I’ll post on that some other time. That is not working quite as well yet.
The following link is to the exact UV unit that I have installed, http://www.emperoraquatics-pond.com/advanced_uv_sterilizer.php, pictured below.
Blog now on WordPress
Hello all,
This blog is now being hosted at WordPress.com rather than Typepad. Hopefully I have managed to import all of the old posts, comments, images, etc. Please email me if you find anything that does not appear to be working.
Thanks,
Matt
Mr. Toad’s Wild Ride
Soon after our pond was built, the wildlife moved in.
Almost immediately, Mr. Toad began living pond-side.
Soon, the kids discovered Mr. Toad.
Then the kids helped Mr. Toad find a boat….looks relaxed, doesn’t he?
Mr. Toad took a 1/2 hour ride in the boat. Since escaping the boat, he has never been seen again. Do you blame him?
Pond Keeping and Construction
It’s been a long time again…life has kept me busy and while I have completed a variety of house projects, etc, very little woodworking has been taking place. I hope to change that soon.
I did manage to build a decorative “pond” in our backyard with koi in it. It is about 8000 gallons and has a rubber liner, a small waterfall, two pumps and a skimmer. I used a natural bog filter design that should allow me to maintain the pond without chemicals…just adding natural bacteria to the pond from time to time and lots of water plants. The pond is now three months old and we are really enjoying it. The sound from the waterfall is really relaxing. I will begin posting pond-keeping thoughts on this blog as well.
Below are some photos of the pond from back during construction. I will post some more recent photos of the pond fully planted and the fish soon.
Overview of the pond before planting….water was still very cloudy
Waterfall with natural bog above it for filtration (before planting)

Natural bog filter above waterfall before planting – filled with red lava rock
Hope you are all having a good summer!
Hisey Bells – Beautifully Handmade
I had nothing to do with making this bell other than ordering it, but I want to post a very positive note about a craftsman that hand makes bells in Ohio. I love anything that is still made by individual craftsmen.
My wife wanted a “dinner bell” for Christmas, and I found “Hisey Bells” through the internet and ordered a custom cast bell (6″) that included our names and wedding date from way back in 1998. The photos below are the result. We are very pleased. They are professional, and great to deal with and make beautiful bells.
American Girl “Stack-able” Bunk Bed Project
My six-year-old daughter got a pair of American Girl dolls for Christmas, and they needed somewhere to sleep.
So, after a little internet research I agreed to make them bunk beds, and my wife agreed to make the mattresses, pillows and quilts for the beds (I think that I got the easier job). The photos below are the result, minus the quilts which are still in production.
I decided to make the beds out of red oak since it was easily available in the thin sizes that I needed. They are finished with dark walnut Watco Danish Oil.
I also decided to make the beds “stack-able” so that they could be used as two twin beds, or stacked to form a bunk bed. The stack-able bunk bed design will also allow for additional beds to be added to the top if another American Girl doll were to ever need a bed. Note that each of the corner posts on the beds has a small square block (or tab) on top of the post that fits into a recess in the bottom of each bedpost that attaches above it, Lego-like.
I didn’t use any formal dimension or drawings for these, I just scaled them from the dolls and started cutting wood.
Below are the beds separated into their two “twin bed” format:
My wife made the mattresses and pillows from the scraps of one of my old oxford-style dress shirts that had become ink stained. She is working on the quilts now, and will post them when they are complete.
In the photo below you can see that next to the beds is a “riser” level that goes between the beds when stacked to allow for more headroom for the bottom doll.
Below is a closer photo of the “riser” level:
All of the side rails and headboard and foot board joints are attached with mortise and tenon joints for strength.
The photo below shows the bottom bed with the riser level installed:
and finally, photos of the two beds and the riser level snapped together into bunk bed formation.
You can see the stack-able Lego-like connectors better in the photo below:
So far ” my client” (my daughter) seems to like the new beds and so do her American Girl dolls, Emily and Molly!
Galoot-in-Training (GIT) Project
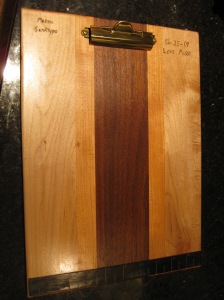
My son (just turned 10), has been working with me in the shop since he was very small. This year for Christmas, he made his mom a clipboard with only safety support from me.
Using the SawStop saw (purchased so that I could teach him to use the table saw), the Dewalt planer and an assortment of hand tools including a Japanese pull saw and a couple of hand planes, he made the clipboard below. It is made from alternating strips of maple, cherry and walnut with hardware from Rockler. The “ruler” on the bottom of the clipboard was his idea and it is made from a scrap piece of ebony. He engraved the inscription on the top of the board and the ruler marks with my Turbo Carver high-speed engraver. Great tool by the way…I should post on that sometime. The finish is Danish Oil.
My wife uses a clipboard everyday to manage the complex schedules of two school kids, so she will get a lot of use from this.
If you don’t know what a Galoot-in-Training (GIT) is, join the OldTools email list. Basically, it refers to the younger generation of woodworkers that we should all be bringing up into this great hobby. I am a strong believer that kids should learn to use tools and get their hands dirty, in addition to learning about the computers, etc of the modern world. The true “Galoots” on the email list might insist that I should only be teaching hand-tool methods for my son to be a real “GIT”, but I have a broader definition of the term.
I hope that he continues to grow in this hobby and enjoy it as much as I do.
I recently noticed a post from Matt Gabardi about his concept for a “Legacy Guild” and I think that the concept is very interesting. Maybe it is the similarity in our Italian roots, but the concept resonates with me. To quote the Guild’s goal from Matt’s website: “Create a forum or blog for people who love woodworking
and want to share this joy with their kids and grandkids.” A good goal.
By the way, Matt’s infill planes are absolutely amazing. Go see them.
The good, the bad and the ugly (online vendors)
Every year I do most of my holiday shopping via online vendors, and this year I think I did 100% of it online.
I always have mixed results with online stores, with some exceeding expectations and some failing miserably. This year, I thought that I would post a few results to possibly benefit the good vendors and encourage the poor ones to improve. After all, if enough if us post the poor vendors, maybe they will come up in searches and warn away other victims (I mean customers).
These are not all workshop related vendors, but several are included in the list.
For 2009….
The GOOD (definitely use these vendors)
Amazon.com – Year after year, Amazon has provided me with good service at good prices. This year was no exception. Many orders, many good results. They also carry many tools (mostly power tools), and I have purchased both full-size floor-mounted shop tools through Amazon as well as smaller tools all with good results. Sure, they advertise on this site, but this review is still the truth.
LeeValley.com – Oh how I love Leevalley.com, let me count the ways. Great tools, great people, good prices, fast shipping…buy stuff now! (I get no advertising or any other support from Lee Valley, although I should).
ArtisticHobbies.com – Good, prompt service and friendly staff. They bailed me out when bananahobby.com (listed under bad, below) left me hung-out-to-dry with 5 days till Christmas. Buy from here, not from Banana (the name should have tipped me off).
The BAD (Do not use these vendors)
Bananahobby.com – I knew nothing about this hobby store before I placed an order…never do that. They came up in a Google search for a particular item that I wanted to buy my son for Christmas (radio controlled vsTank...super cool and highly recommended!). In stock and ready to ship with more than two weeks to go till Christmas. Soon after I placed an order, I got an email from UPS saying "manifest received" and looking like it was shipping…so, I happily assumed that it was about to ship. It did not. 5 days before Christmas, I got an email saying that one item in my order was back-ordered. Did the rest of the order ship? Couldn't tell. The 1-800 phone number says that they don't answer the phone during the Holidays, web-chat support only. Wait on web chat for 30 minutes. Find out that, no, they had not shipped any of my order and now I had to pay for expedited shipping if I want anything to arrive before Christmas…I paid it only reluctantly since it was Bananahobby's mistake, and not mine. I also paid for expedited shipping at another store's website to get the item that was not available at Bananahobby in time for Christmas. I did a search on Banana Hobby complaints too late to help me, and found out that my experience with them was typical.
Finally, when the item arrived, it was broken and had obviously been opened before shipping. I am still fighting with them to resolve. They do not respond to emails or to chat messages.
Do not use!
If you want a vsTank, buy from ArtisticHobbies.com above instead(note that Artistic Hobbies is not paying me and I am in no way involved with them).
Suggested Improvements for SawStop Contractor Saw
I love my newish SawStop contractor saw, but there are a couple of things that I would improve. They are very minor though.
1. The dust collection is OK, but not as good as it was on my old Dewalt hybrid table saw. A lot of dust is ejected out from around the blade, even with the zero-clearance insert and a good 4" dust collection system attached.
2. The clear plastic blade guard is very thin, and can be accidentally pushed sideways into the blade if given light lateral pressure at its toe end. It just scrapes the blade, and does not get cut, but it should not be able to be pushed so easily into the blade in my opinion. Since the guard is plastic, it does not trigger the safety system.
3. When done for the day, I have repeatedly forgotten to turn off the power switch that powers up the blade safety system…this probably doesn't matter much other than lost energy usage, but it seems like the system ought to "fall-asleep" automatically if the saw is not used for a period of time.
Again, these are minor and I would buy the saw again in an instant.
Dewalt 733 Planer RIP
The new belt for the planer came on Friday and I installed it into the machine (see photo in previous post). The good news is that the belt was easy to install. The bad news is that it lasted for under five minutes.
I ran about 3 passes through the planer and I noticed that it was making odd noises as I went. After a couple of minutes, the new belt shredded and the machine sounded like it was going to fly apart.
After removing the cover again, and looking closer at the lower belt pulley, I noticed that the shaft for the pulley was bent. Apparently this is why both the first and second belts blew…the real root of the problem.
It appears that this repair would take replacement of the entire blade assembly…cost prohibitive on a ten year old machine. So, it looks like I am in the market for a replacement.
Normally I would celebrate the need to buy a new tool, but somehow lunchbox planers are just not that exciting. They do what they need to do, and that is about all.
Dewalt Planer Belt Replacement
My 10 year old Dewalt DW733 thickness planer decided to consume it’s motor belt this weekend.
I was thicknessing some cherry stock for a sideboard that I am building when the planer began to make a loud clunking noise. A few minutes later it spit chunks of partially melted beige rubber out at me and stopped cutting.
The side cover of the planer was easily removed, and I can find nothing wrong other than the disintegrated belt. I ordered a new one from Dewalt ($27), and hopefully that will fix the machine when it comes in.
Until then, the project will have to go on hold.
Photo above is the unit with the side off and new belt installed.


